Strategy Templates Syntax
Strategy templates enable our users to design custom options spread templates. These spread templates can then be applied to any option series using the Spread desk.
Creating a strategy template
To open the strategy templates manager window, click on the strategy templates icon in the main menu.

The strategy templates window will appear on screen. You will be greeted with a screen that has three sections. The left hand column of the window has a list of templates names. These can be changed in the upper right hand section. If you wish to add more templates, simply click the cross in the top left hand of the window.
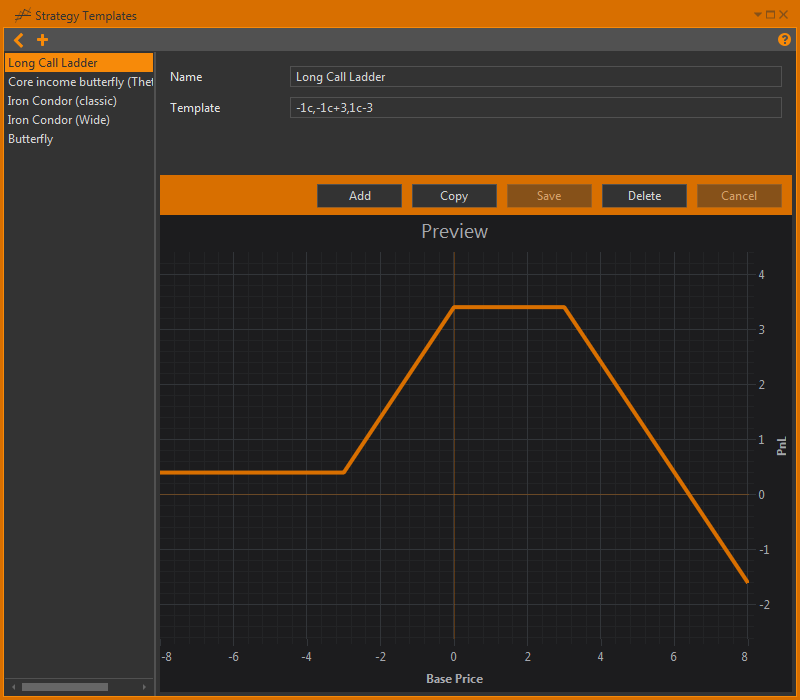
The upper middle and right hand portion of the window contains the template name and it’s formula. The template text field contains the formula for creating a spread. We have our own custom syntax for making spreads that I will explain in the paragraph below. Directly below this section, there are five buttons allowing you to add copy save or delete a strategy, as well as cancel working with it.
Finally, the main portion of the window is comprised of the ‘preview’ – this is where the payoff function of the spread which is build up according to the formula is previewed on the screen. Note that the Base price and PnL axes are purely theoretical.
Anyhow, let us talk about the syntax involved in the template formula:
cmeans callpmeans put,denotes a different option, either in type or strike price.
As a default, whenever a new strategy is created, it auto-populates the template formula with one call and one put at the same strike price. Consequently, you can see this reflected in the risk profile of the preview:
However, when you look at the template, you will note that there is a number to the left hand side of the c and p.
These numbers represent the quantity of options to be bought when the strategy is executed / modelled.
Try to change the quantities and see how the preview changes.
Also remember that negative quantities like -1 are perfectly fine to use, and denote a short position.
As an example, if you simply put -1c,-1p, you will notice that the risk profile is inverted, to represent the changing risk profile.
Alternatively, if you put 2c,1p you’ll note that the risk profile becomes lopsided at a ratio of 2:1.
Again, this can be explained because the strategy now represents the buying of two calls and only one put option.
But, so far we have only talked about strategies that use the same strike price. If you wish to have strategies that use multiple strikes, you need to understand that our syntax is relative. That means, each option strike is positioned relative to every other option in the strategy. This is done in order to enable easy application to multiple different option series.
To specify an option strike relative to another option strike, simply add a number to the right of the c or ‘p`` figure, but before the next comma. For example, in its simplest form, if you simply specify 1c-1, it would indicate your strategy will always purchase 1 call, and it will be at the strike price one below the ‘central strike’ price. 1c-2therefore would indicate purchasing the same amount and type of options (1c = one call) but, the strike price would now be two ‘steps’ below the central strike price. If there are no relative numbers (IE:1c,1p`) then the option is assumed to be applied to the central strike price.
Remember: the central strike price is still a theoretical term,
and it only becomes real once you’ve chosen a strike to apply your strategy to.
Try to create your own custom strategy templates. In order to get you started, here are a few examples:
1c, 1p– a straddle;1c+1, 1p-1– a strangle with a two strike width;1c, -1c+1– a vertical bull spread;1c-1,-2c,1c+1– a long call butterfly;1p-5,-1p-4,-1c+4,1c+5– an Iron condor with a total ‘width’ of 8-10 strikes;1p-10,-1p-8,-1c+8,1c+10– an iron condor with a total ‘width’ of 16-20 strikes.
Applying a strategy to a market using the spread desk
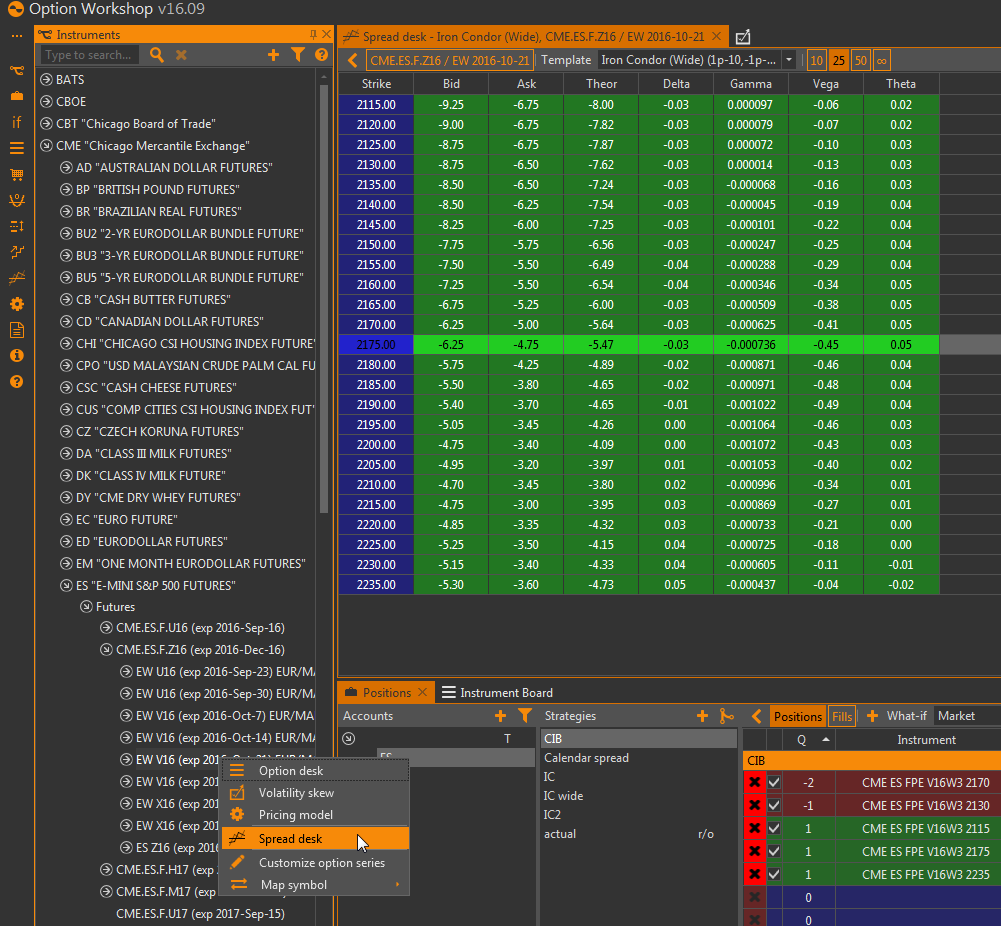
Once you have created a strategy template, it can be applied to real markets. There are two ways to do this. This first way is to select an options series from the instruments tree, right click it and select the ‘spread desk’ option.
Once you’ve opened the spread desk, simply select which template you wish to apply to the option series, and it will be applied, showing all of the spreads qualities including price and the greeks. Then simply select which strike price is appropriate and drag it into your positions tab, much like the process of modelling options with the option desk. You’ll be greeted with a screen detailing which account and strategy the spread will go into, as well as a multiplier, which asks how many spreads to buy (or sell, then multiplier must be negative). Finally you can specify how the fills will be made. Because it’s a modelled trade, you can specify the ‘best’ (cheapest) bid/offer, or chose the midmarket price, which is composed of the average of the bid/offer. Alternatively you can chose the last traded price, which is composed of the last trades of each option in the spread. Finally you can chose the theoretical price.
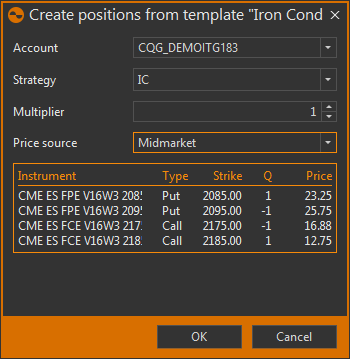
Below all of these options will be a mini summary of each option contract that is to be traded. Once all of the criteria are selected, simply press ok and watch the position populate in the positions tab.
A faster way exists to trade strategy templates. Simply right click on an option in the options desk window and select the spreads templates option. The ‘central strike’ will be the strike that was selected with the right click.
These two methods allow for either an overall view of your strategies for detailed assessment, or a quick and convenient way to apply it to your modelling and trading.
Permalink